“Give a girl the right shoes and she can conquer the world.” –Marilyn Monroe
Introduction
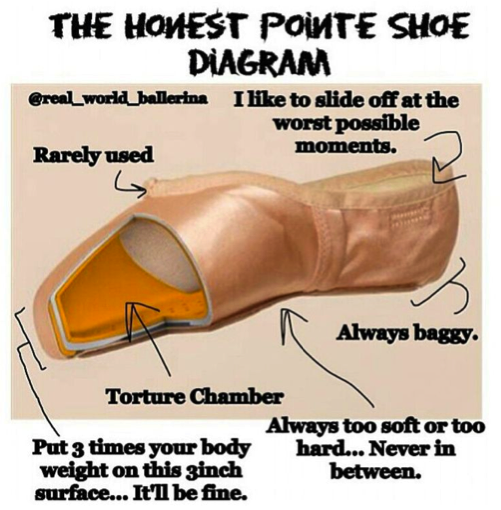
Starting pointe can be overwhelming, partly because it is exciting to have reached such an important milestone, but also because there are so many tips and tricks that you need to know. In today’s newsletter we will cover everything from breaking in your pointe shoes to getting them ready for performance. Here’s a quick summary of the important things to know:
· Work on your shoes a little bit when they are new
· Invest in jet glue and a stitch kit
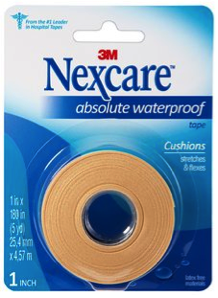
· Always keep Orajel, Nexcare tape, and second skin on hand
· Plan ahead during performance season
Read on for some great info that will help give your shoes a long and healthy life!
· Work on your shoes a little bit when they are new
· Invest in jet glue and a stitch kit
· Always keep Orajel, Nexcare tape, and second skin on hand
· Plan ahead during performance season
Read on for some great info that will help give your shoes a long and healthy life!
When Your Shoes Are New
New shoes are a great thing, but can be frustrating when you break them in with no help. Here are some recommendations that will make life a bit easier:
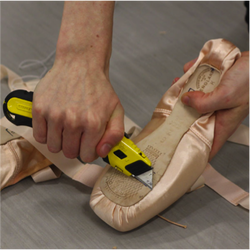
1) Buy a scruffier or use a box cutter to (carefully!) scruff the bottom of your shoes. This will help keep you from slipping on the floor.
2) Head outside and bang your shoes on the concrete. It will help get the sound out of them so you can land your jumps quietly!
3) Step on the boxes of your shoes when you aren’t wearing them. Once you know where your natural arch “breaks” the shoes, you can bend them in that place by hand (once or twice forward and back—no more). This well help to break them in.
4) Rub the area around the vamp with rubbing alcohol or peroxide. This helps to soften the satin and makes it easier to go through demi pointe.
5) Some people darn their pointe shoes. They use a thick thread to create a platform that goes around their box. I only recommend doing this if you wobble on your shoes (usually this happens due to a manufacturing error).
Always let your shoes air out after wearing them. This will help preserve them! You can also spray them with vodka to help get rid of the smell!
When Your Shoes Are Dying
Dead shoes provide no support, and can be dangerous to dance in! To extend the life of your shoes, you can try a few things:
1) Start by baking them. Set your oven to 250 F, tuck your ribbons and elastic into your shoes, and leave them in the oven for 10-15 minutes. This sucks out all the moisture from your shoes, so that you can jet glue them effectively.
2) Buy some jet glue and use it generously, but don’t add it where you don’t need it. Try to spread the glue so that it dries evenly on your shoes.
3) If your shoes are really dying, you can use furniture epoxy instead of jet glue. While this is very effective, you can easily ruin a pair of shoes. Always use a paintbrush to apply it and read the directions carefully.
Remember, there will come a time when your pointe shoes die. It is very important to get new shoes ahead of time so that you do not have to dance on dead shoes, so plan ahead if you need to special order them. Many people decorate their old pointe shoes, or you can rip out the shank and use them as demi pointe shoes in technique class. In addition, don’t be afraid to cut off the ribbon and elastic, throw them in the washer/dryer, and sew them onto a new pair of shoes.
When Your Feet Are Dying
Not long after you start pointe, you will discover how much it can rough up your feet. While the blisters are painful, it is good to know where you get the most friction on your foot. This allows you to prevent future blisters.
1) If you do get regular blisters, tape your feet with squishy nexcare tape. Just wrap a piece of tape around the toes/bunions on your feet where you tend to get blisters. This creates a barrier, protecting your feet. Be sure to not put the tape onto a blister. Taking that tape off will be very painful!
2) If you do get a blister, take good care of it. Clean it regularly, and try to wear shoes that allow the blister to breathe. When you go into pointe class, cover it with Orajel. This will numb the blister and make the class less painful.
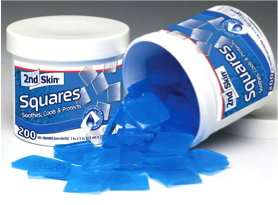
3) Another way to help alleviate the pain of a blister during class is to put a piece of second skin on it. Cut a little square out, peel the plastic off, and place it directly onto your blister. Tape in place with toe tape.
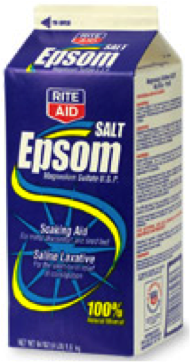
4) Your feet will get swollen from pointe. Give them the occasional Epsom salt bath. Use warm water and be generous with the salts. They cost about $1-$2 for a big carton at Kroger and they work miracles. You can even do a bubble bath with them if you are super stressed out!
The bottom line is this—take care of your feet and take preventative action. When you do get a blister, baby it and take care of it. But a blister is never an excuse to sit out of dance class!
1) If you do get regular blisters, tape your feet with squishy nexcare tape. Just wrap a piece of tape around the toes/bunions on your feet where you tend to get blisters. This creates a barrier, protecting your feet. Be sure to not put the tape onto a blister. Taking that tape off will be very painful!
2) If you do get a blister, take good care of it. Clean it regularly, and try to wear shoes that allow the blister to breathe. When you go into pointe class, cover it with Orajel. This will numb the blister and make the class less painful.
3) Another way to help alleviate the pain of a blister during class is to put a piece of second skin on it. Cut a little square out, peel the plastic off, and place it directly onto your blister. Tape in place with toe tape.
4) Your feet will get swollen from pointe. Give them the occasional Epsom salt bath. Use warm water and be generous with the salts. They cost about $1-$2 for a big carton at Kroger and they work miracles. You can even do a bubble bath with them if you are super stressed out!
The bottom line is this—take care of your feet and take preventative action. When you do get a blister, baby it and take care of it. But a blister is never an excuse to sit out of dance class!
Show Time
Different teachers have different preferences for how to handle pointe shoes on stage. However we all agree that your ribbons should never, ever come untucked during a performance! When you tie your ribbons, sew the knot so that it won’t come undone, and spray it with hairspray for good measure.
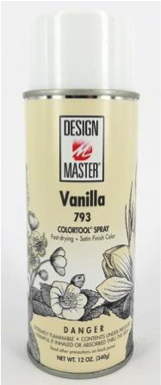
Some people like to take the shine out of pointe shoes for performances. This helps the to blend into your tights (and therefore lengthens your lines) and if there is corps dancing involved, it makes everyone’s shoes look the same. Historically, many people have used calamine lotion to “color” their shoes, but you can buy spray paint for fabric at Hobby Lobby that is easier, faster, and works better (I like Design Master in the color Vanilla). Stick to colors that are in the “classical pink” family. If you are in a pinch, you can always use compact make up powder on your shoes. If you do choose to take the shine out, make sure you sew your ribbons so that they shiny side faces in!
Some people like to take the shine out of pointe shoes for performances. This helps the to blend into your tights (and therefore lengthens your lines) and if there is corps dancing involved, it makes everyone’s shoes look the same. Historically, many people have used calamine lotion to “color” their shoes, but you can buy spray paint for fabric at Hobby Lobby that is easier, faster, and works better (I like Design Master in the color Vanilla). Stick to colors that are in the “classical pink” family. If you are in a pinch, you can always use compact make up powder on your shoes. If you do choose to take the shine out, make sure you sew your ribbons so that they shiny side faces in!